Thursday 23 March 2017
System Administration
#### System Administration Topics ##
Text Editors
Console Based Text Editors:
1. Emacs
2. Nano
3. Vim/vi
Graphical (GUI) Editors:
1. Gedit
2. Gvim
3. Sublime (have to install separately)
Now we are going to discuss about vi/vim editor.
Vim is
a highly configurable text editor built to enable efficient text editing. It is
an improved version of the VI editor distributed with most UNIX systems. It is
a tool, the use of which you must be learned. Program is written by Bram
Moolenaar et al.
Usage of vi/vim, it has three modes
1. Command mode
2. Insert Mode
3. Ex-mode
Command mode: this mode is the default mode following things we can do
Yank/copy
(yy) - copying the single line
(nyy) n number of lines at a time you can
copy.
p - Paste a content bellow the cursor
P - Paste content above the cursor
dd - Delete a single line
ndd n
number of line delete yet a time
x - Deleting a single character
dw - Deleting a single word
. - redo
u - Undo
J - Joining the line
r - Replace the character
Arrow Keys
h - Left
j - Down
k - Up
l - Right
Ctrl+d - Scroll Down
Ctrl+u - Scroll UP
Insert Mode: This mode is used to insert the text into the file
i - Inserting the content before the
cursor position
I - it will insert the character starting
of the line
a - it will insert the character of the
cursor append
A - It will append the character from end
of the line
O - It will insert a new line above the
cursor
o - It will insert a new line below the
cursor
s - Substitute the stream
EX-Mode: Esc is used to change the mode. Press Escape key to enter EX-Mode
:w - save the modifications
:q - quit
:wq - save & quit
:w! - save forcefully
:q! - Quit forcefully
:set
nu - setting the line numbers
:set nonu - Remove line numbers
:<number> - it will goes to particular line
:%s/find string name/replace
string/g -
to replace the string group of lines
:r - reading the another file from here
:!<command> - command will execute from here
:r
!date - output will save in current file

Redhat Linux Installation

After booting from RHEL bootable CD/DVD, We will get above
screen
Ø If
you want to install OS using GUI then hit ENTER key
Ø If
you want to install OS using TEXT mode (CLI) then type linux test hit ENTER key
Currently we
are installing Operating system using GUI mode.

If you want to verify you installation media (OS CD/DVD) press OK (It will take long time to verify).
Press SKIP to jump next screen.

Click NEXT

Select the Language then click NEXT

Select Keyboard Language then click NEXT

Click OK

It will give you a WARNNING since you don’t have a key click on SKIP

Click on YES to continue

Options:
Remove all
partitions on selected drives and create default layout this options will delete all the drive partitions and install OS
Remove all
Linux Partitions this option will only
remove Linux partitions and creates default layout, install OS
Use free space this option will install on free space of the drive creates
default layout
Create Custom
layout this option will not create any layout you have to create as per
your requirement
This option
will give more customization you to create your own layout (Selected
Customize Layout)

Now you can able to see HDD space to create partitions follow click on NEW

After clicking on NEW you will see above popup
First create
/boot because it needs normal partition to store MBR (master boot record). 100MB
is enough for /boot partition.
Mount point
/boot
File system
Type: ext3 OR ext4
Select fixed
size Click OK

See above screen /boot partition is created.
Note: Always
remember to create LVM partitions OR RAID partitions is recommended, because later
on if you want extend the ROOT file system is possible and easy.
To create LVM
partition click on NEW you can able to see popup as below

For creating a LVM partition we have to create Physical Volume select file system type as physical volume (LVM)
Select Fill to maximum allowable size then click on OK

See above screen LVM PV is created now select PV and click on LVM popup will open as below screen

Change the Volume group name as required. Example: VG01
Click on ADD

As above screen select Mount point as “/” slash, provide Logical
volume name “ROOT” for easy identification, provide the size as per your
requirement (Minimum 10GB). Click on OK
Again
click on ADD

Select File system type as SWAP, provide logical volume name as
“SWAP” for easy identification. Provide the swap size is always (RAM SIZE * 2)
in my case 2GB RAM. Click on OK

As you created above all the partitions are created. Click NEXT
Minimum
Recommended Partitions
Slash “/”
/boot
SWAP

Select label and click NEXT
(if you want to change label you can change it using edit option)

Here provide your system name (Example:
ARK-IT-Solutions.localdomain)
Click
on EDIT

If you are using DHCP in your network select Use dynamic IP configuration
If not using
DHCP enable IP4 and provide IP address and Netmask Click on OK

Provide the
gateway IP and DNS IP and Click on NEXT

Select the time zone and click on NEXT

Provide your password and confirmation password then click on NEXT

Select to install the required software’s while installing the
operating system, select software development and web server and select
Customize now.
Then
click on NEXT

Select the required packages from all the fields click on
optional packages and check all (as showed in below screen)

Selected all the optional packages as well click on CLOSE

then click on NEXT

After next dependencies will be resolved and ready for installation

Click NEXT to install Operating system

Installation
is in process (it will take few minutes depends on selected packages)

After completion creating partitions and installing packages it will ask you to reboot the server. Click on Reboot

After reboot it will ask you to complete next options click on FORWARD

Select Yes I agree to the license agreement and click FORWARD

Firewall enabled and disabled
If you enable
the firewall you have to allow the services and ports as you required
If you want to
enable security click on Enable or else disable and click FORWARD

Disable the SELinux if you don’t know the usage. Click on FORWARD

Click YES

click
Forward

Select
Date & Time Click forward

Select
Yes Click Forward

Click on
No Thanks

Click FORWARD

Provide additional username to create and provide password click on FORWARD

Test your sound then click on FORWARD

Click on Finish

It will ask you
to reboot click OK
Your server
installation is successfully completed now you can use it.
Profile Management
A user profile is a visual display of personal data
associated with a specific user, or a customized desktop environment. A profile
refers therefore to the explicit digital representation of a person's identity.
A user profile can also be considered as the computer representation of a user
model.

/etc/profile - it contains system void variables, if
you do any modification in this file it will effect to the administrator and
local user profiles.
~/.bash_profile - it contains user specific variables,
if you do any modification in this file it will effect to that particular
account only.
/etc/bashrc - it contains system void alias
variables
~/.bashrc - it contains user specific alias
variables
.bash_history - it contains all executed commands
history
Commands:
#
alias - it will show the aliases
 |
|
ailas Command Output
|
#
unalias <alias name> - it will remove mentioned alias
Note: you can always define an
alias using /etc/bashrc OR .bashrc files
File
Permissions:
|
Permission
|
Value
|
Number
|
|
Read
|
r
|
4
|
|
Write
|
w
|
2
|
|
Execute
|
x
|
1
|
Default
permissions when you create a file or directory
|
File Permissions
|
|
|
File
|
644
|
|
Directory
|
755
|
 |
|
File and Directory Permissions
|
In
above image explained about file permissions
Commands
to Change file/directory permissions
Symbolic permissions
u - user/owner
g - Group
o - Others
w - Write
x - Execute
+ - Allow
- - deny
# chmod [options] <mode/permissions>
<file/directory> - to change permissions file/folder
Example: chmod 744 file1
# chmod u+rwx file or directory : in case of user only
# chmod ug+rwx file or directoty : in
case of user and group
# chmod u+w,g+r,o+x directory/file
# chmod u+rw,g+rw directory/file
# chmod u-r, g-w,o-rw directory/file
# chmod ugo+rwx file/directory
# chmod ugo-rwx file/directory
# chown [options] <new owner>
<file/directory> - to change ownership of file/folder
Example: chown user2 file1
chown user1:group1 file2
# chgrp [options] <new group>
<file/directory> - to change group of file/folder
Example: chgrp gorup2 file2
User Administration

Type of Users:
Root
user - Default user highly privileged UID is
0. This will create while installing the operating system
System
users - is nothing but services, at the time
of installing particular package. UID starts from 1 to 499.
Local
users - after installing of the operating
system admin user will create these users. UID starts from 500 to 65534.
Ø After
creating a user, user home directory will be created in default path /home.
Ø One
group is will be created with same user name (primary group)
Ø Files
from /etc/skel will be copied automatically to user home directory
Ø /etc/passwd
file is updated with user information
Ø /etc/group
file is update with primary group information
Important files
/etc/passwd User Information
/etc/shadow User Passwords
/etc/group Group Information
/etc/gshadow Group Passwords
User Administration
Commands:
# useradd <user
name> - To create specified local user
# useradd –d
<home directory> <user name> - create a user with specified home
path

# useradd –u <UID> <user
name> - create user with specific UID.
# passwd <user
name> - change the user password
# userdel <user
name> - delete user
# userdel <user
name> - delete user including home directory
# finger <user
name> - See user properties
# chfn <user
name> - Change user information
 |
|
chfn Command Output
|
 |
|
/etc/passwd file user entry
|
# chage –l <user name> - to check user password expiry and account expiry information
 |
|
chage -l Command Output
|
# su - <user name>
- Switch to other user account
# id <user name> - it will show the user id
|
|
|
id Command Output
|
# system-config-users - create and manage user account in GUI
Usermod command options:
-c = We can add comment field for the user
account.
-d = To modify the directory for any existing
user account.
-e = Using this option we can make the
account expiry in specific period.
-g = Change the primary group for a User.
-G = To add a supplementary groups.
-a = To add anyone of the group to a
secondary group.
-l = To change the login name
-L = To lock the user account. This will lock
the password so we can’t use the account.
-m = moving the contents of the home
directory from existing home dir to new dir.
-p = To Use un-encrypted password for the new
password. (NOT Secured).
-s = Create a Specified shell for new
accounts.
-u = Used to Assigned UID for the user
account between 0 to 999.
-U = To unlock the user accounts. This will
remove the password lock and allow us to use the user account.
Creating Groups:
Group information is located/stored on
/etc/group file.
# groupadd <group
name> - Create a group with specified name
# usermod –G <group name> <user
name> - Add user to group
# gpasswd –a ravi Administrators – Adds the
user ravi to the group Administrators
# gpasswd –A ravi Administrators – give user
ravi administrative rights to the group
# gpasswd –d ravi Administrators – remove
user ravi from the group Administrators
# groupdel <group name> - Delete group
name
# groupmod –n <new group name> <old
group name> - change group name
# newgrp - <group name> - Login into
the group if successful, re-initializes the user environment
Access Control List ACL Linux / Unix
POSIX Access Control List ACL : To manage file security using POSIX (Portable
Operating System Interface) access control list ( ACL ).
ACLs allows to assign different
permissions for different users and groups. ACL allows fine-grained
permissions to be allocated to a file. Users or groups as well as users and
groups identified by a UID or GUID can be granted permissions.
The same permissions we can use
below flags apply on files and directories.
Alpha Symbols r: Read, w: Write, x: Execute
Numeric symbols 4 – Read, 2 – Write, 1 –
Execute
§
Permissions restricting access
to a file to the file owner, membership of a single group or everyone.
§
The file owner can set ACLs on
individual files or directories.
§
XFS file systems have built in
ACL support.
§
EXT4 file systems created on
RHEL7 have ACL enabled by default.
POSIX Access Control List two types:
1.
Access
ACLs: we can use access ACLs to grant permissions for a particular file
or directory.
2.
Default
ACLs: We can use default ACLs
only on a directory but if a file inside that directory does not have an
ACL, it inherits the permissions of the default ACLs of the directory.
When ACL’s are required..?
We are going to see about ACL
usage in detailed in below explanation, In this example we are going to use
four users and three groups.
§
User
Names : ravi, kumar, acl and root
§
Groups
: finance, engineering and root
To create user and assign
password use below command. Repeat the same command to create multiple users.
[root@Techtutorials ARK-ACL]# useradd ravi
[root@Techtutorials ARK-ACL]# passwd ravi
Changing password for user ravi.
New password:
BAD PASSWORD: The password is shorter than 8 characters
Retype new password:
passwd: all authentication tokens updated successfully.
To create group and add users
to group, repeat the same steps create and add multiple groups
[root@Techtutorials ARK-ACL]# groupadd finance
[root@Techtutorials ARK-ACL]# usermod -G finance ravi
[root@Techtutorials ARK-ACL]# cat /etc/group |grep finance
finance:x:1005:ravi

File Permissions
As per above screenshot
permission of the file / directory can only given to User, Group and Others.
User ownership and Group ownership.
§
How to restrict particular
user, group has full permissions to file / directory
§
How to provide an file /
directory permissions to user / group without chaning existing ownership
All the above conditions will
be possible by using POSIX Access Control List – ACL
Let’s see how can we acheive
above conditions practically
Check ACL permission of file / directory
[root@Techtutorials ARK-ACL]# getfacl test1
# file: test1
# owner: root
# group: root
user::rw-
group::r--
other::r--
[root@Techtutorials ARK-ACL]# getfacl /root/ARK-ACL/
getfacl: Removing leading '/' from absolute path names
# file: root/ARK-ACL/
# owner: root
# group: root
user::rwx
group::r-x
other::r-x
Assign POSIX Access Control
List to perticular user
Before assigning ACL
permissions example is below
[root@Techtutorials ARK-ACL]# chmod 770 test1
[root@Techtutorials ARK-ACL]# ls -l test1
-rwxrwx--- 1 root root 0 Jul 15 15:46 test1
[root@Techtutorials ARK-ACL]# su - ravi
Last login: Fri Jul 15 17:05:16 IST 2016 on pts/1
[ravi@Techtutorials ~]$ cd /ARK-ACL/
[ravi@Techtutorials ARK-ACL]$ vi test1
[ravi@Techtutorials ARK-ACL]$ cat test1
cat: test1: Permission denied
As we see above output we have
add full permissions to test1 file for user (owner) and group. We have
restricted all others with no access. I have logged in as ravi user and trying to access the
test1 file but it is giving an error saying permission denied
Let’s assing ACL permission to
particular user and see how it works
Assigned Read permissions using
ACL
[root@Techtutorials ARK-ACL]# setfacl -m u:ravi:r test1
Verify ACL is working as
excepcted
[root@Techtutorials ARK-ACL]# su - ravi
Last login: Fri Jul 15 17:06:27 IST 2016 on pts/1
[ravi@Techtutorials ~]$ cd /ARK-ACL/
[ravi@Techtutorials ARK-ACL]$ cat test1
[ravi@Techtutorials ARK-ACL]$ cat > test1
-bash: test1: Permission denied
As per above output we are able
to read test1 file but we are not able to write test1 file
Let’s provide write access and
see
[root@Techtutorials ARK-ACL]# setfacl -m u:ravi:rw test1
[root@Techtutorials ARK-ACL]# getfacl test1
# file: test1
# owner: root
# group: root
user::rwx
user:ravi:rw-
group::rwx
mask::rwx
other::---
[root@Techtutorials ARK-ACL]# su - ravi
Last login: Fri Jul 15 17:11:44 IST 2016 on pts/1
[ravi@Techtutorials ~]$ cat > /ARK-ACL/test1
Test
^C
[ravi@Techtutorials ~]$ cat /ARK-ACL/test1
Test
Assign ACL to Group
[root@Techtutorials ARK-ACL]# setfacl -m g:finance:rwx acltest
[root@Techtutorials ARK-ACL]# getfacl acltest
# file: acltest
# owner: root
# group: root
user::rw-
group::r--
group:finance:rwx
mask::rwx
other::r--
[root@Techtutorials ARK-ACL]# cat /etc/group |grep finance
finance:x:1005:ravi
[root@Techtutorials ARK-ACL]# su - ravi
Last login: Fri Jul 15 17:32:09 IST 2016 on pts/1
[ravi@Techtutorials ~]$ cat > /ARK-ACL/acltest
Test
^C
[ravi@Techtutorials ~]$ cat /ARK-ACL/acltest
Test
ravi user part of finance group
so when we provide permission to finance group automatically user ravi will get
an access
Restrict particular user from
group has full permissions
In this scenario restrict
particular user from group. Group finance has full access but member of finance
group kumar user restricted. See below example
[root@Techtutorials ARK-ACL]# usermod -G finance kumar
[root@Techtutorials ARK-ACL]# cat /etc/group |grep finance
finance:x:1005:ravi,kumar
[root@Techtutorials ARK-ACL]# setfacl -m u:kumar:--- acltest
[root@Techtutorials ARK-ACL]# getfacl acltest
# file: acltest
# owner: root
# group: root
user::rwx
user:kumar:---
group::r--
group:finance:rwx
mask::rwx
other::---
[root@Techtutorials ARK-ACL]# su - kumar
[kumar@Techtutorials ~]$ cat /ARK-ACL/acltest
cat: /ARK-ACL/acltest: Permission denied
Revoke POSIX Access Control List permissions
from user / group
[root@Techtutorials ARK-ACL]# getfacl acltest
# file: acltest
# owner: root
# group: root
user::rwx
user:kumar:---
group::r--
group:finance:rwx
mask::rwx
other::---
[root@Techtutorials ARK-ACL]# setfacl -x g:finance acltest
[root@Techtutorials ARK-ACL]# getfacl acltest
# file: acltest
# owner: root
# group: root
user::rwx
user:kumar:---
group::r--
mask::r--
other::---
removing acl from particular
file we have to use -x flag along with setfacl command
Replicate file ACL permissions
to another file
To replicate one of the file
ACL permissions to another file. In this example we are going to replicate
test1 file ACL to acltest file.
[root@Techtutorials ARK-ACL]# getfacl test1
# file: test1
# owner: root
# group: root
user::rwx
user:ravi:rw-
group::rwx
mask::rwx
other::---
[root@Techtutorials ARK-ACL]# getfacl acltest
# file: acltest
# owner: root
# group: root
user::rwx
user:kumar:---
group::r--
mask::r--
other::---
[root@Techtutorials ARK-ACL]# getfacl test1 | setfacl --set-file=- acltest
[root@Techtutorials ARK-ACL]# getfacl acltest
# file: acltest
# owner: root
# group: root
user::rwx
user:ravi:rw-
group::rwx
mask::rwx
other::---
Copying the access ACL into the
Default ACL
[root@TechTutorials ~]getfacl --access /ARK-ACL/ | setfacl -d -M- /root/ARK-ACL/
Conclusion
POSIX Access Control List is
extended permissions which are used provide access to more users / groups, who
are not owners of user:group.
String Related Commands
String
related commands will help you to print/search file text as required
HEAD: Head prints the first N
number of data of the given input. By default, it prints first 10 lines of each
given file.
Example: head file2
head –n 2 file3 #number of lines
|
|
|
head -n Command Output
|
SORT: Sort is a simple and very useful
command which will rearrange the lines in a text file so that they are sorted,
numerically and alphabetically. By default, the rules for sorting are:
ü Lines
starting with a number will appear before lines starting with a letter.
ü Lines
starting with a letter that appears earlier in the alphabet will appear before
lines starting with a letter that appears later in the alphabet.
ü Lines
starting with a lowercase letter will appear before lines starting with the
same letter in uppercase.
Example: sort –r file2
 |
|
sort -r Command Output
|
Options
-b ignores leading blanks
-d considers only blanks and alphanumeric
characters
-f fold lower case to upper case
characters
-g compare according to general numerical
value
-i consider only printable characters
-M compare (unknown) < `JAN' < ...
< `DEC'
-n compare according to string numerical
value
-r reverse the result of
comparisons
-c check whether input is sorted; does
not sort
-k start a key at POS1, end it at POS2
(origin 1)
-m merges already sorted files; do not
sort
-o write result to FILE instead of
standard output
-s stabilize sort by disabling
last-resort comparison
-S use SIZE for main memory buffer
-t use SEP instead of non-blank to blank
transition
-T use DIR for temporaries, not $TMPDIR
or /tmp
-z end lines with 0 byte, not newline
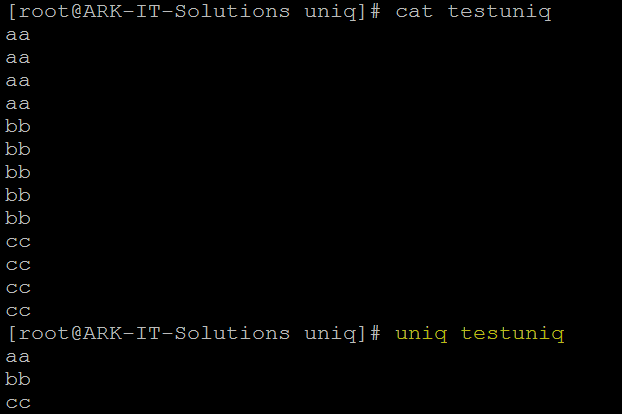
UNIQ:
Uniq command is helpful to remove or detect duplicate entries in a file.
Example: uniq <file name> - it will print uniq values
 |
|
uniq Command Output
|
PASTE:
It is very useful for merging a single file and also for merging set of
files as well.
ü paste
command examples for single file handling
ü paste
command examples for multiple files handling
Example: paste –s file1 #All the separate lines are printed as one line
paste –d, -s file1 #Combined the 'file1' and 'file2' with comma (,) separated.
Example: paste –s file1 #All the separate lines are printed as one line
paste –d, -s file1 #Combined the 'file1' and 'file2' with comma (,) separated.


CUT: Cut is used for text
processing. You can use this command to extract portion of text from a file by
selecting columns.
Example: Below screenshot is the best example, first i have used cat command to see the content of file'testcut'. In next highlighted cut command i have cut the 4 characters from the text.
Example: Below screenshot is the best example, first i have used cat command to see the content of file'testcut'. In next highlighted cut command i have cut the 4 characters from the text.
 |
|
cut Command Output
|
TR: It will translate content
of the file from one case to another case vice versa. Upper case to Lower case.
Note: if you
want to change the file text to caps then redirect the output to another file.
Example: in below example i have used 'file1' content to convert to caps lock characters.
Example: in below example i have used 'file1' content to convert to caps lock characters.
 |
|
tr Command Output
|
SED:
Sed is a Stream Editor used for modifying the files in unix (or linux).
Whenever you want to make changes to the file automatically, sed comes in handy
to do this. Most people never learn its power; they just simply use sed to
replace text. You can do many things apart from replacing text with sed.
Example: In below screenshot i have replaced the 'linux' string to 'unix' .
Example: In below screenshot i have replaced the 'linux' string to 'unix' .
 |
|
sed Command Output
|
DIFF: To compare the difference
between two files text you can use this command
 |
File Links

File Types
-b - block device file Example: HDD and pen
drive
-d - directory file
- - common file
c - Character device file Example:
terminal
l - Linked file
Linking means reflecting to the original file, In case of copy command
updating is not possible after copying the file from the source to destination.
In link updating is possible for both the files.
|
HARD
Link
|
SOFT Link
|
|
1. The destination file is exact image of the source file.
|
1. The destination file size is length of the source file
name
|
|
2. If source got deleted also even we can access the
destination file
|
2. if source got deleted we can’t
access destination file
|
|
3. inode numbers of source and destination are same
|
3. inode
numbers of source and destination are different
|
|
4. We can’t put the hard link to different file system
(partitions) because it will different.
|
4. we can
put a link between different file systems
|
|
5. Ex: cp –l <source> <destination>
|
Ex: cp –s
<source> <destination>
|

Search related commands

Search commands will help you to search files/directories
and file content.
Command GREP
Grand regular expression, it is used
to search the file name and content of the file

Command FIND
It is command to find files with
different options.
# find / -iname <file
name> - to search files with file name
# find / -perm
770 - to search files with their
permissions
# find / -user <user
name> - to search files with user ownership
# find / -size
10M - to search files with their size
 |
|
find Command Output
|
Command LOCATE
Locate command can be used to
searching for the file based on the string name from / onwards.
 |
Task Automation and Task Scheduling
Scheduling is very useful when you prefer do some
automation jobs.
For scheduling the tasks in Linux we are using at and crontab
Command AT:
$ at – it is used to scheduled one are more jobs
(commands) for a single execution.
Example: $ at 10:30
$ at now+5 minutes
$ at tomorrow
$ at 10:30 july 15 2015
|
The expression
|
Would translate
to
|
|
noon
|
12:00 PM October 18 2014
|
|
midnight
|
12:00 AM October 19 2014
|
|
teatime
|
4:00 PM October 18 2014
|
|
tomorrow
|
10:00 AM October 19 2014
|
|
noon tomorrow
|
12:00 PM October 19 2014
|
|
next week
|
10:00 AM October 25 2014
|
|
next monday
|
10:00 AM October 24 2014
|
|
fri
|
10:00 AM October 21 2014
|
|
NOV
|
10:00 AM November 18 2014
|
|
9:00 AM
|
9:00 AM October 19 2014
|
|
2:30 PM
|
2:30 PM October 18 2014
|
|
1430
|
2:30 PM October 18 2014
|
|
2:30 PM tomorrow
|
2:30 PM October 19 2014
|
|
2:30 PM next month
|
2:30 PM November 18 2014
|
|
2:30 PM Fri
|
2:30 PM October 21 2014
|
|
2:30 PM 10/21
|
2:30 PM October 21 2014
|
|
2:30 PM Oct 21
|
2:30 PM October 21 2014
|
|
2:30 PM 10/21/2014
|
2:30 PM October 21 2014
|
|
2:30 PM 21.10.14
|
2:30 PM October 21 2014
|
|
now + 30 minutes
|
10:30 AM October 18 2014
|
|
now + 1 hour
|
11:00 AM October 18 2014
|
|
now + 2 days
|
10:00 AM October 20 2014
|
|
4 PM + 2 days
|
4:00 PM October 20 2014
|
|
now + 3 weeks
|
10:00 AM November 8 2014
|
|
now + 4 months
|
10:00 AM February 18 2015
|
|
now + 5 years
|
10:00 AM October 18 2019
|
$ atq -
is a command to see scheduled jobs
$ atrm <job number> – is a command to remove the
schedules jobs
CRONTAB:
Crontab (CRON TABle) is a file which contains the schedule of cron entries to
be run and at specified times. crontab if your name does not appear in the file
/usr/lib/cron/cron.deny. If only cron.deny exists and is empty, all users can
use crontab.
The crontab is a list of commands that
you want to run on a regular schedule, and also the name of the command used to
manage that list.
Example: crontab –e - to edit the jobs
crontab
–l -
to list the scheduled jobs
crontab –c –u <user name> - to
see particular user jobs
crontab –r - to remove crontab file
crontab format
# * * * * * command to execute
# │ │ │ │ │
# │ │ │ │ │
# │ │ │ │ └───── day
of week (0 - 6) (0 to 6 are Sunday to Saturday, or use names; 7 is Sunday, the
same as 0)
# │ │ │ └──────────
month (1 - 12)
# │ │ └─────────────── day
of month (1 - 31)
# │ └──────────────────── hour
(0 - 23)
# └───────────────────────── min
(0 - 59)
This
above example will send a mail yet every 5th 10th and 15th minute of every hour
File System
A
file system is the underlying structure a computer uses to organize data on a
hard disk. If you are installing a new hard disk, you need to partition and
format it using a file system before you can begin storing data or programs.

Minix - 14
characters, 64MB of storage
Ext - Extended
file system, 255 characters, 2GB of storage
When you’re going to format the
Linux file system using extend file system it will create blocks.
1). Master Block/Boot Block
2). Super Block
3). Inode Block
4). Data Block
- Master block
entry is located at partition table, only boot partition contains master
blocks data. Remaining partitions master blocks are empty.
- Super block
just like an index to the book and it will holds to the information as
follows
a. Utilized
inode numbers
b. Free
inode numbers
c. Utilized
data blocks
d. Free
data blocks
Super block holds all this information.
3. Inode table (index table) which holds all the information
about files/directories like permissions, owner, group name, size and time
stamps.
4096 bytes default block size
15 data blocks = inode
If data size is more than 100MB
block size is 4096bytes. If data size is less than 100MB block size is
1024bytes.

Directory holds Inode number of file
and file name
4. Data block storage of files
Table Now below is a very brief comparison of the most
common file systems in use with the Linux world
|
File System
|
Max File Size
|
Max Partition Size
|
Journal-ling
|
Notes
|
|
Fat16
|
2 GB
|
2 GB
|
No
|
Legacy
|
|
Fat32
|
4 GB
|
8 TB
|
No
|
Legacy
|
|
NTFS
|
2 TB
|
256 TB
|
Yes
|
(For Windows Compatibility) NTFS-3g is installed by default in
Ubuntu, allowing Read/Write support
|
|
ext2
|
2 TB
|
32 TB
|
No
|
Legacy
|
|
ext3
|
2 TB
|
32 TB
|
Yes
|
Standard linux filesystem for many years. Best choice for
super-standard installation.
|
|
ext4
|
16 TB
|
1 EB
|
Yes
|
Modern iteration of ext3. Best choice for new installations
where super-standard isn't necessary.
|
|
reiserFS
|
8 TB
|
16 TB
|
Yes
|
No longer well-maintained.
|
|
JFS
|
4PB
|
32PB
|
Yes (metadata)
|
Created by IBM - Not well maintained.
|
|
XFS
|
8 EB
|
8 EB
|
Yes (metadata)
|
Created by SGI. Best choice for a mix of stability and advanced
journaling.
|
|
GB = Gigabyte (1024 MB) :: TB =
Terabyte (1024 GB) :: PB = Petabyte (1024 TB) :: EB = Exabyte (1024 PB)
|
||||
Journaling:
A journaling
file system is more reliable when it comes to data storage. Journaling file
systems do not necessarily prevent corruption, but they do prevent
inconsistency and are much faster at file system checks than non-journaled file
systems. If a power failure happens while you are saving a file, the save will
not complete and you end up with corrupted data and an inconsistent file
system. Instead of actually writing directly to the part of the disk where the
file is stored, a journaling file system first writes it to another part of the
hard drive and notes the necessary changes to a log, then in the background it
goes through each entry to the journal and begins to complete the task, and
when the task is complete, it checks it off on the list. Thus the file system
is always in a consistent state (the file got saved, the journal reports it as
not completely saved, or the journal is inconsistent (but can be rebuilt from
the file system)). Some journaling file systems can prevent corruption as well
by writing data twice.
Journalling
______________________________________
| | |
Writable
more ordered
more journal
i. Write block – metadata is stored in HDD
ii. Ordered more – metadata and actual data
iii. Journal will maintain more space to do journalling
Network File
System (NFS): A Network File System
(NFS) allows remote hosts to mount file systems over a network and interact
with those file systems as though they are mounted locally. This enables system
administrators to consolidate resources onto centralized servers on the
network.
SAMBA (SMB): Samba is a software it is used to share the file and
printer between Linux to Windows vice verse
Creating
Standard Partition: Disk
partitioning is the act of dividing a hard disk drive (HDD) into multiple
logical storage units referred to as partitions, to treat one physical disk
drive as if it were multiple disks, so that a different file system can be used
on each partition.
All the device files are stored in
/dev/ directory. If your Hard disk is connected
SATA
DRIVE IDE
DRIVE
Primary
master /dev/sda /dev/hda
Primary
slave /dev/sdb /dev/hdb
Secondary
master /dev/sdc /dev/hdc
Secondary
slave /dev/sdd /dev/hdd
#
fdisk -
it is a utility used for creating, deleting, listing and checking partitions
In this situation i am using vmware
environment so just added one disk 5GB in size to server.
# ls /sys/class/scsi_host/ | while
read host ; do echo "- - -" > /sys/class/scsi_host/$host/scan ;
done - To
scan new hardware changes.

In above image we can able to see
new hard disk is found it does not have valid partitions
To create a partition we have to
identify HDD name we can use fdisk utility to find.
# fdisk –l – to identify HDD name
In this case our disk name is
/dev/sdb
# fdisk /dev/sdb

List the options using m option
:
p - print the
partition list in fdisk utility
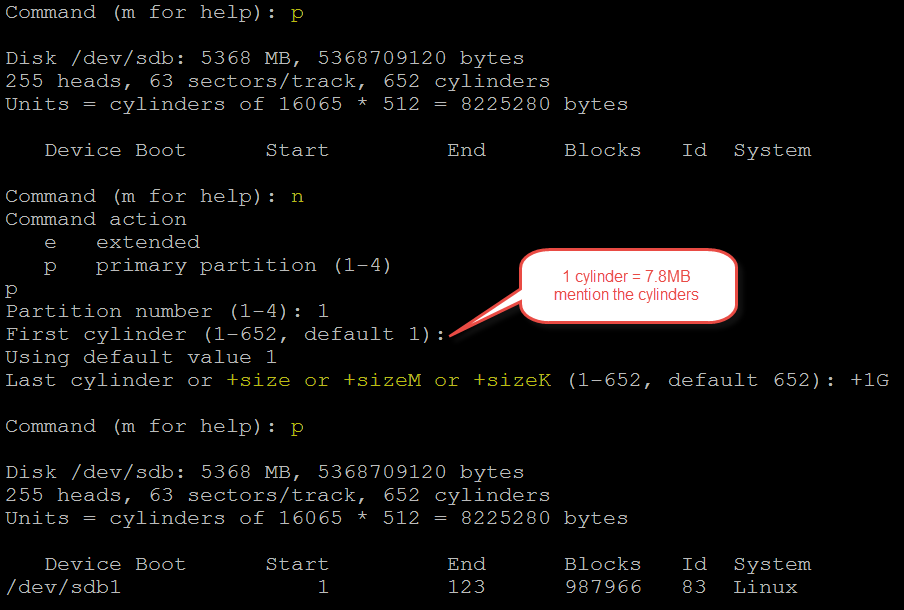
n – to create a new partition
mention the partition type primary
of extended.
Note: (one extended OR 3 Primary 1 Extended) if you create
extended partition first you can’t able to create a one more partition in same
disk. We can create 3 primary and 1 extended partition.
p for primary
enter the partition number (there is
no partitions in our scenario entered 1)
if want to enter the space in first
step then calculate cylinders (7.8MB*number)
if you want to provide the space
using MB, KB and GB then just hit enter
+1G
Now see partition is created or not
using p
p
 To save the partition information :wq
To update partition
information to kernel
# partprobe /dev/sdb – to update
partition information to partition table without reboot
Partition created now we have to
create a file system in partition
# mkfs.ext3
/dev/sdb1 - make file
system in partition

After completion of creating a file
system we have to mount the partition for use
Create a directory to mount # mkdir
/arkit
# mount /dev/sdb1
/arkit - to mount the file system

To check filee system size # df
–h -
check file system size
Note: SATA and SCSI we can create a 15 partitions and IDE 64
partitions only
To access partition of
windows in linux
#mount –t vfat
/dev/hdax /mnt
in order to check the
label of any partition
#e2label /dev/hdax
where x is number
Mounting CD Rom
# mount –t auto /dev/hdc
/media/cdrom
-t : file type
auto : file type
in order to check
where cdrom is attached we can open the file fstab
#vi /etc/fstab
now in case of RHEl
3.0 we have to use command in order to unmount.
# umount /media/cdrom
and then eject the cdrom
in case of RHEL 4.0 we simply type
# eject
Mounting Floppy
#mount –t auto
/dev/fd0 /media/floppy
in case of floppy we
have to umount first then only we remove floppy otherwise all content of floppy
may be lost or floppy may be physically damaged.
# umount /media/floppy
Permanent mount file system we have
to edit /etc/fstab/ file.

add the entry as mentioned in above
screenshot
# mount –a - to
verify mentioned entry is correct, if not it will give you error message
# e2label /dev/sdb1
RAVI - to add label to partition

# e2label /dev/sdb1 - to
check disk label
DELETING
PARTITION:
Deleting
the partition will lead to lose the important data
Remove the entry from /etc/fstab if
it is mounted as permanent

# fdisk /dev/sdb
:d
If you have more than one partition
it will ask for the partition id
:wq
# partprobe /dev/sdb
# fdisk –l /dev/sdb
Extending the
Swap:
Create a partition
Change
the partition type ID to 82 using t option in fdisk utility
# mkswap /dev/sdb2 -
it will format in swap file system
#
free - to
check swap size
Options: -m in MB format
-G
in GB format

# swapon /dev/sdb2 – in your case it
may different.
To make permanent mount of swap file
system edit the /etc/fstab file and add the entry
# mount –a - to
refresh the /etc/fstab mounts
Logical Volume Manager
LVM is a
logical volume manager for the Linux kernel that manages disk drives and
similar mass-storage devices. Using logical volume manager will give more
flexibility to increase/reduce file system in more effective way and no loss of
data.
Advantages
LVM gives you
more flexibility than just using normal hard drive partitions:
- Use
any number of disks as one big disk.
- Have
logical volumes stretched over several disks.
- Create
small logical volumes and resize them "dynamically" as they get
filled up.
- Resize
logical volumes regardless of their order on disk. It does not depend on
the position of the LV within VG, there is no need to ensure surrounding
available space.
- Resize/create/delete
logical and physical volumes online. File systems on them still need to be
resized, but some (such as ext4) support online resizing.
- Online/live
migration of LV being used by services to different disks without having
to restart services.
- Snapshots
allow you to back up a frozen copy of the file system, while keeping
service downtime to a minimum.
Support for various device-mapper
targets, including transparent file system encryption and caching of frequently
used data.
To
make LVM’s we will first create physical volumes, we will combine all the PV’s
into the volume group and top of the VG’s we will create LVM’s.
Let’s
create Partitions
[root@ARK-IT-Solutions ~]# fdisk /dev/sdb
Command
(m for help): n
Command
action
e extended
p primary partition (1-4)
p
Partition
number (1-4): 1
First
cylinder (1-652, default 1):
Using
default value 1
Last
cylinder or +size or +sizeM or +sizeK (1-652, default 652): +1G
Command
(m for help): t
Selected
partition 1
Hex
code (type L to list codes): 8e
Changed
system type of partition 1 to 8e (Linux LVM)
Command
(m for help): wq
The
partition table has been altered!
Calling
ioctl() to re-read partition table.
Syncing
disks.
[root@ARK-IT-Solutions
~]# partprobe /dev/sdb
Repeat the above step for remain
partition creations.
Creating
Physical volumes
#
pvcreate /dev/sdb1 /dev/sdb2 /dev/sdb3 – to create PV’s
#
pvscan - to see if any PV’s are there
#
pvdisplay - to see PV properties, attributes of a
physical volume
#
pvs - to see the PV’s information, produces
formatted output about PV’s
#
vgcreate /dev/sdb1 /dev/sdb2 /dev/sdb3
#
vgdisplay - It will display all VG properties
#
vgscan - It will scan for all existing volume
groups and rebuild caches
#
vgextend <pv name> - allows you to add one or more
initialized physical volumes to an existing
volume group to extend it in size.
#
vgremove <vg name> - to delete VG
#
vgreduce <vg name> <pv
name> - to remove PV from VG
Note: Volume Group reducing will lead to data
loss, we have to take a backup of complete VG then do above step. Do not
practice above step in any production environment.
#vgrename <old vg name> <new vg
name> - to rename
VG name
#vgmerge
<vg1> <vg2> - To merge two VG’s as one group
#
lvcreate –n <lv name> -L +<size> <vg name> - create a logical
volume in an existing VG
#
lvdisplay - allows
you to see the attributes of a logical volume like size, read/write status,
snapshot information etc.
#
lvextend –L +500M <lv path> -
to extend the LV space
#
lvreduce –L -500M <lv path> - to reduce the LV space
Note: reducing the logical volume space will
lead to data loss, before reducing the lv space we have to take lv snapshot to
restore back to same state. Do not practice this command until unless it’s
required.
Logical Volume Management (LVM) Part-2
Continuation...... of Logical Volume
Management.
Command options:
lvchange Change the attributes of logical
volume(s)
lvconvert Change logical volume layout
lvcreate Create a logical volume
lvdisplay Display information about a logical
volume
lvextend Add space to a logical volume
lvmchange With the device mapper, this is
obsolete and does nothing.
lvmdisks can List devices that may be used as
physical volumes
lvmsadc Collect activity data
lvmsar Create activity report
lvreduce Reduce the size of a logical volume
lvremove Remove logical volume(s) from the
system
lvrename Rename a logical volume
lvresize Resize a logical volume
lvs Display information about logical
volumes
lvscan List all logical volumes in all volume
groups
# lvm - to enter into the logical volume mode
# lvrename - to rename the lv name
#
lvremove - to delete the LV
# lvmdump - to collect all the information about
LV’s, VG’s and PV’s
#
lvmdiskscan - to see LV’s, VG’s and PV’s info with
size
#
lvs - to check logical volumes info
# lvcreate –size 100m –snapshot –name
snap /dev/data/lv0 - creates a snapshot logical volume
named /dev/data/snap which has access to the contents of the original logical volume named /dev/data/lv0 at snapshot
logical volume creation time. If the original logical volume contains a file
system, you can mount the snapshot logical volume on an arbitrary directory in order to access the contents of the file system to run a backup
while the original file system continues to get updated.
# mkfs.ext3
/dev/data/lv0 - to make
file system in lv
# mount <lv path>
<mount point> - to mount the lv
To
example of snapshot
To
restore the snapshot data mount the snapshot to mount point and copy the files
from snapshot to original path
In
order to delete the logical volume
#umount
/lv0
#lvremove
/dev/data/lv0
#vgremove
data
#pvremove
/dev/sdb1
#pvremove
/dev/sdb2
Disk Quota Management
 |
|
Disk Quota Management
|
Disk quotas are commonly used by ISPs, by Web hosting companies, on FTP sites,
and on corporate file servers to ensure continued availability of their
systems.
Quotas are used to limit a user’s or a group of user’s ability to consume disk
space. This prevents a small group of users from monopolizing disk capacity and
potentially interfering with other users or the entire system.
·
Soft limit
This is the maximum amount of space a user
can have on that partition. If you have set a grace period, this will act as an
alarm. The user will then be notified she is in quota violation. If you have
set a grace period, you will also need to set a hard limit. A grace period is
the number of days a user is allowed to be above the given quota. After the
grace period is over, the user must get under the soft limit to continue. By
default grace period have seven days limits.
·
Hard limit
Hard limits are necessary only when you are
using grace periods. If grace periods are enabled, this will be the absolute
limit a user can use. Any attempt to consume resources beyond this limit will
be denied. If you are not using grace periods, the soft limit is the maximum
amount of available space for each user.
·
Grace Periods
Linux has provided the default of seven days
for both inode and block usage. That is, a user may exceed the soft limit on
either resource for up to seven days. After that, further requests by that user
to use files will be denied.
To do quota we will use edquota, repquota and quotacheck tools to create modify
and report quota management.
Quota
can be applied to users and groups, block size and inode number.
We have to install/verify quota packages is installed.
~]# rpm –qa |grep quota - to verify quota rpm is installed or not
~]# rpm –qa |grep quota - to verify quota rpm is installed or not
Now open /etc/fstab to
open quota
/dev/sdb1 /qcheck ext3 defaults,usrquota,grpquota 1 2
Either reboot or remount
the file system to enable quota
~]# mount –o
remount,usrquota,grpquota,rw /qcheck
In this case /qcheck is
the mount point.
To
enable or create a quota file we have to run
~]# quotacheck –cugm /qcheck
quotacheck command options
-v scans and prints verbose
-c performs a new scan
-g scan quota for groups
-m remount the scanned file system
-u scan quota for users
-a Check all quota-enabled,
locally-mounted FS
Switch
on the quota using below command
~]# quotaon –avug
Now quota is on. Add quota soft and hard limits to any user
Now verify writing some
dump data (dd command).
Login
as a ravi user then
~]$ dd if=/dev/zero of=/qcheck/test bs=1024 count=10
~]$ dd if=/dev/zero
of=/qcheck/test bs=1024 count=21
In above screenshot it is
showing that warning and exceeded limits for user ravi.
To
verify the quota settings
~]# quota –u <user name>
To increase a grace period
for a user
~]# edquota –T <user name>
Enable the quota for a
group.
~]# edquota –g <group name>
In this case quota is
group name
Removing
quota
Switchoff
the quota
~]# quotaoff –avug
Then clear the entry in /etc/fstab
Then clear the entry in /etc/fstab
Remount the partition
using
~]# mount –o remount,rw <mountpoint>
RPM is a powerful software manager. It
can install, remove, query, and verify the software on your system. Setup of
applications is called as package.
|
Packages Types
|
Core Packages: These packages are available with you installation
media
Extra Core Packages: These extra core packages mean after OS
installation, upgrade of package OR release is called as extra core
packages.
|
RPM Explanation
|
Above is the explanation about rpm
structure
# rpm <options>
<package name> -
to install, remove, query and upgrade RPM
Options:
-I - install
-v - verbose
-q - query
-e - deleting/erasing
-U - upgrade
-a - all
-h - hashes
‘#’ s
# rpm –import <key
file name> - to
import the rpm license key
Drawbacks of
RPM:
1. Distribution
packages
2. Architecture
specific
3. Dependency
# rpm -ivh <package
name> - to
install package
|
Installing rpm
|
# rpm –import <key
file path> - to
import license key
|
Importing RPM Key
|
# rpm –ev <package
name> - to
delete/erase rpm
# rpm –qa |grep telnet - to
query the rpm
|
Searching rpm
|
# rpmbuild <file
name> - to
RPM from source code
Source Code: source code is the external packages which we are
writing some scripts OR software packages.
Note: when we are installing some of the packages using
package manager it will ask you to install dependency packages, installing all
the packages manually will eat most of your time. To resolve these types of
dependencies we have to configure YUM server.
YUM: yellow-dog
updater modified
Some of the advantages of YUM
include
• Automatic resolution of software
dependencies.
• Command-line and graphical
versions. YUM can install or upgrade software by using either the command-line
version (yum command) or one of two graphical programs:
• Adding and removing software.
• Package updater that only shows
software updates available from RHN.
• Multiple software locations at one
time. YUM can be configured to look for software packages in more than one
location at a time.
• Ability to specify particular
software versions or architectures.
YUM downloads software from repositories located over the network, either on
the local network or over the Internet. The files, including the RPM package
files, in these repositories are organized in a specific way so that they can
be found by the YUM client.
Configure YUM server we have to
install createrepo RPM in server
# rpm -ivh createrepo-0.4.4-2.fc6.noarch.rpm
|
Installing createrepo Package
|
Copy all the RPM packages to one
location local path (in this case I have copied to /yum location)
Edit the file
# vi
/etc/yum.repos.d/rhel-debuginfo.repo
|
YUM sample configuration file content
|
Save the file and exit
Create a repository
# createrepo –v /yum/ - to create a
repository database
Repo data path (repository files)
# yum list all -
to check packages are fetching from YUM server
# yum install <package
name> - to install packages
Like above all the packages and
there dependencies will be installed.
# yum remove <package name> - to remove package its
dependencies
# yum clean all - it
will clean all the cache data of yum server
# yum update <package
name> - to update/upgrade
mentioned package
If you want make this YUM as
centralized server for all the local domain servers. We have to share this
using FTP and HTTP protocol.
SERVER SIDE
[rhel-debuginfo]
name=ARK-IT
baseurl=ftp://yum/
enabled=1
gpgcheck=1
gpgkey=ftp://yum/rpm-gpg/RPM-GPG-KEY-redhat-release
CLIENT SIDE
[rhel-debugino]
Name=ARK-IT
Baseurl=ftp://SERVERIP/PATH
Enabled=1
Gpgcheck=0
Redundant array of independent disk
RAID (originally redundant array of
inexpensive disks; now commonly redundant array of independent disks) is a data
storage virtualization technology that combines multiple disk drive components
into a logical unit for the purposes of data redundancy or performance
improvement.
In
RAID we have different RAID levels
1. Level
0 - striped disk array without fault
tolerance
2. Level
1 - mirroring and duplexing
3. Level
2 - error-correcting coding
4. Level
3 - bit-interleaved parity
5. Level
4 - dedicated parity drive
6. Level
5 - block interleaved distributed parity
7. Level
6 - independent data disks with double
parity
8. Level
10 - a stripe of mirrors
RAID Level 0: It’s
just stripping. RAID Level 0 requires a minimum of 2 drives to implement.
- RAID 0 implements a striped disk array, the data is
broken down into blocks and each block is written to a separate disk drive
- I/O performance is greatly improved by spreading the I/O
load across many channels and drives
- Best performance is achieved when data is striped across
multiple controllers with only one drive per controller
- No parity calculation overhead is involved
- Very simple design
- Easy to implement
RAID Level 1: For Highest performance, the controller
must be able to perform two concurrent separate Reads per mirrored pair or two
duplicate Writes per mirrored pair. Raid level 1 requires a minimum of 2 drives
to implement.
- · One Write or two Reads possible per
mirrored pair
- · Twice the Read transaction rate of
single disks, same Write transaction rate as single disks
- · 100% redundancy of data means no
rebuild is necessary in case of a disk failure, just a copy to the
replacement disk
- · Transfer rate per block is equal to
that of a single disk
- · Under certain circumstances, RAID 1
can sustain multiple simultaneous drive failures
- · Simplest RAID storage subsystem
design
RAID Level 2: Each bit of data word is written to a
data disk drive each data word has its Hamming Code ECC word recorded on the
ECC disks. On Read, the ECC code verifies correct data or corrects single disk
errors.
- · "On the fly" data error
correction
- · Extremely high data transfer rates
possible
- · The higher the data transfer rate
required, the better the ratio of data disks to ECC disks
- · Relatively simple controller design
compared to RAID levels 3,4 & 5
RAID Level 3: Byte-level striping with dedicated parity, data block is
subdivided ("striped") and written on the data disks. Stripe parity
is generated on Writes, recorded on the parity disk and checked on Reads.
Requires minimum 3 disks to implement
- · Very high Read data transfer rate
- · Very high Write data transfer rate
- · Disk failure has an insignificant
impact on throughput
- · Low ratio of ECC (Parity) disks to
data disks means high efficiency
RAID Level 4: Block-level striping with dedicated
parity. Each entire block is written onto a data disk. Parity for same rank
blocks is generated on Writes, recorded on the parity disk and checked on
Reads.
Requires minimum 3 disks
·
-
Very high Read
data transaction rate
- · Low ratio of ECC (Parity) disks to
data disks means high efficiency
- · High aggregate Read transfer rate
RAID Level 5: Block-level striping with distributed
parity. Each entire data block is written on a data disk; parity for blocks in
the same rank is generated on Writes, recorded in a distributed location and
checked on Reads. Requires minimum 3 disks to implement
·
-
Highest Read data transaction rate
- · Medium Write data transaction rate
- · Low ratio of ECC (Parity) disks to
data disks means high efficiency
- · Good aggregate transfer rate
RAID Level 6: Block-level
striping with double distributed parity. Two independent parity computations
must be used in order to provide protection against double disk failure. Two
different algorithms are employed to achieve this purpose. Requires minimum 4
disks implement
·
-
RAID 6 is essentially an extension of RAID level 5 which allows for
additional fault tolerance by using a second independent distributed
parity scheme (dual parity)
- · Data is striped on a block level
across a set of drives, just like in RAID 5, and a second set of parity is
calculated and written across all the drives; RAID 6 provides for an
extremely high data fault tolerance and can sustain multiple simultaneous
drive failures
- · RAID 6 protects against multiple
bad block failures while non-degraded
- · RAID 6 protects against a single
bad block failure while operating in a degraded mode
- · Perfect solution for mission
critical applications
RAID Level 10: Disks within the group are mirrored and
groups are stripped, required minimum 4 disks to implement
- · RAID 10 is implemented as a
striped array whose segments are RAID 1 arrays
- · RAID 10 has the same fault
tolerance as RAID level 1
- · RAID 10 has the same overhead for
fault-tolerance as mirroring alone
- · High I/O rates are achieved by
striping RAID 1 segments
- · Under certain circumstances, RAID
10 array can sustain multiple simultaneous drive failures
·
Excellent solution for sites that
would have otherwise gone with RAID 1 but need some additional performance
boost
Implementing
the RAID will be two types 1.Software RAID and 2.Hardware RAID
Let’s
see the difference between those
|
SOFTWARE RAID
|
HARDWARE RAID
|
|
1. It will use computer system CPU
|
1. It will use its own CPU
|
|
2. Low cost compare to H/W RAID
|
2.More cost
compare to S/W RAID
|
|
3. It has data integrity issues due to system crashes
|
3.No data integrity issues
|
|
4. No write-back cache
|
4.It is
capable of write-back cache
|
|
5. Limited operating system migrations
|
5.Can be
migrated to any OS type
|
|
6. Unprotected at boot (cannot manage or protect data at
boot):Drive failure or corrupted data during boot and before the RAID
software become active leads to an inoperable system
|
6. Protected
at boot: No negative impact on data availability
when boot
drive has medium errors or fails completely
|
|
7. Performance issues will be there
|
7.No
performance issues compare to S/W RAID
|
Add
new disks for RAID Creation
Create
partitions using disks, partition type should be Linux raid AutoDetect (fd)
Creating
RAID Device
#
mdadm --create /dev/md0 --level=5 --raid-disk=3 /dev/sdb1 /dev/sdb2 /dev/sdb3
#
mkfs.ext3 /dev/md0 - to make file system in RAID device
Mounting
and using raid device
# mdadm
–detail /dev/md0 -
to see the raid device details
 # mdadm /dev/md0 --fail
/dev/sdb3 - to do
manual failure of disk
# mdadm /dev/md0 --fail
/dev/sdb3 - to do
manual failure of disk
To see the detail of raid device and
any failed disks
# mdadm /dev/md0 --remove
/dev/sdb3 -
Removing failed drive from RAID
# mdadm /dev/md0 --add
/dev/sdb4 - Adding New
disk to RAID Device
To Destroy RAID Device and its
related disk completely wipe
# umount
/raid - to un mount the
file system
# mdadm –stop /dev/md0 -
Stopping RAID Device
# mdadm –remove
/dev/md0 - to remove RAID
Device
# fdisk
/dev/sdb use d to delete all the
disks from OS
Subscribe to:
Post Comments
(
Atom
)
No comments :
Post a Comment